Category Archives: Bulk Herbs & Whole Foods

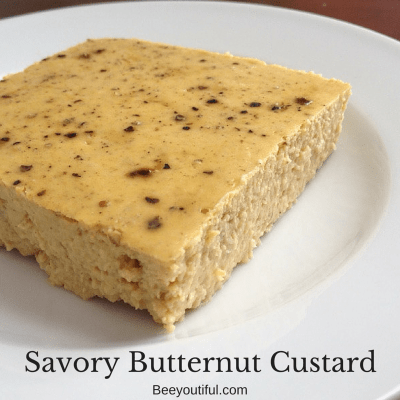
Foodie Friday: Savory Butternut Custard (Gluten Free and Paleo Friendly!)

Butternut squash can easily stand in for pumpkin in a sweet pie, but did you know that it can also be the star of its own savory version? Try this delicious herb-flavored custard as a new way to incorporate the bright orange squash into your nutrient-dense holiday menu.

Savory Butternut Custard

IMG_9245

Slice 1 small onion and caramelize slowly in butter or ghee. It should be very soft and beginning to deepen in color.

Place cooked onions in a blender or food processor, along with:

Cooked pulp from one medium butternut squash (about 2.5 to 3 cups)

Pulp from 1 whole head of roasted garlic (or fresh equivalent, cooked with onion)

1-2 Tbs homemade bone broth concentrate, or equivalent concentrated seasoning such as demi-glace to equal the flavor of 1 cup broth (see note)

1 cup full-fat coconut milk or coconut cream

4 eggs

1 tsp dried/crushed sage leaves

1 tsp dried/crushed thyme leaves

1/2 tsp salt

Fresh ground pepper to taste

Whiz everything in blender or food processor for about 2 minutes or until onions are incorporated and mixture is completely smooth.

Pour into oiled medium pan placed inside larger pan holding several cups of water.

Sprinkle top of custard with freshly ground pepper. Bake in water bath at 325 about an hour or until knife comes out clean.

insta Savory Butternut Custard from Beeyoutiful.com

Notes:

Don’t be tempted to skip the extra onion/garlic prep steps and use raw ingredients! Pre-cooking them makes a huge difference in the smoothness of the final flavor.

If you don’t have any broth concentrate or appropriate dry substitute, reduce the coconut milk to 1/2 cup and add 1/2 cup very strong broth.

Seven Ways to Prepare Now for Low Stress and Budget-Friendly Holiday Gifting

seven ways to prepare now for low stress and budget-friendly holiday gifting from Beeyoutiful.com

I know, I know, I KNOW. There’s a special kind of frustration and pressure that mounts when you walk into a store in October (probably still wearing short sleeves!) only to see Christmas decorations up already.

Goodness, let me have my fall, people! I’m not even getting to wear my boots yet!

But what I do appreciate are all the great ideas for holiday gifts that are creeping into my Pinterest feed, and the fun craft ideas that float across Facebook. And given that I have almost already filled my entire schedule for the next 12 weeks, I am glad to be reminded that if I want to make a few thoughtful gifts, it might be time to plan on it now.

So while we’re not ready to turn on the Christmas tunes at Beeyoutiful headquarters and throw any tinsel just yet, we are going to give you a head start with our list of seven Christmas gifts you might want to make or purchase before the holiday rush this year.
seven ways to prepare now for low stress and budget-friendly holiday gifting from Beeyoutiful.com

1. Cinnamon Ornaments

They’re not edible, but these cookie imposters smell divine and are great as teacher gifts or for Grandma.

1 cup Applesauce
1 1/2 cup Ground Cinnamon
*You can also add small amounts of glitter to your dough to add extra glitz to your ornaments!

Mix until thoroughly incorporated. Place dough on a sheet of cinnamon-dusted waxed paper; place a second sheet on top of the dough. Roll to 1/4 inch thickness, and then peel off the top paper. Use your favorite cookie or biscuit cutters to cut dough into shapes.

Using a thin spatula, place dough shapes on a parchment paper-lined cookie sheet. Using a ice pick or skewer, poke a hole on the top part of each ornament to later insert the ribbon.  Bake in a preheated oven at 200* until solid (up to 2 hours).

Once cooled, insert ribbon or decorative string and tie in a hanging loop. Hang on your Christmas tree or anywhere you’d like to spread the scent of Cinnamon.

2. Herbal Sugar Scrub

This is a great gift for those on your list who enjoy a bit of pampering.
1 cup Sugar
1/2 cup Sweet Almond Oil
1/8 cup Raw Honey
1/8 cup crushed Hibiscus petals
30 drops of Peppermint Essential Oil (Or substitute another favorite oil)

Mix together until thoroughly incorporated and then store in a tightly capped glass jar. Place in tins or decorative glass jars for a beautiful gift. Use a chalk board tag and a liquid chalk pen for an added cute touch on the label.

3. Herb and Spice Blends

Buy your herbs and spices in bulk and create some of your own blends, then give them as gifts to your favorite cooks! Several popular spice blends are Cajun, Italian, Herbs de Provence, Ranch, and Cinnamon Sugar. Here’s a salt blend to get you started.

Kickin’ Popcorn Salt

1 cup Sea Salt
1/2 cup Chili Powder
1 Tbs Cayenne Powder
1/4 cup Paprika
1/4 cup Garlic Granules
1 Tbs Oregano
1 Tbs Thyme

Mix together and store in a tightly capped glass container. Pop your popcorn, then melt butter and add 1-2 teaspoons of this salt to taste. (I also like to add the juice of a lime.) Drizzle over freshly popped popcorn and toss to distribute evenly.

4. Herbal Tea Blends

Use bulk herbs and teas to create custom blends for your next tea time. (Learn the simple steps to blending herbs here!)

5. Essential Oil Rollerball

Create your own unique aromatherapy blends using your favorite essential oils, jojoba oil, and an empty rollerball bottle. The Complete Book of Aromatherapy and Essential Oils has some great recipes and tips on making safe and fragrant blends!

6. Spiced Vanilla Granola

Get our delicious recipe here! Make it ahead in big batches, then portion it into pretty containers to gift later.

7. Books

Choosing a favorite wellness book for a friend is a great way to share information and education, and boost their long-term health too. Talk about a gift that keeps on giving!


shop Beeyoutiful.com

Foodie Friday: Seven Healthy Reasons to Add Ghee to Your Pantry

#FoodieFriday- Seven Healthy Reasons to Add Ghee to Your Pantry from Beeyoutiful.com

The average American may have no idea how useful and beneficial (and healthful) Ghee can be! We’ve recently added Pure Indian Foods’ Organic, Grass-fed Ghee to our line because of its rich benefits and versatility as both a supplement and a food item.

We know you’ll love it as much as we do, once you know why Ghee is so amazing!

#FoodieFriday- Seven Healthy Reasons to Add Ghee to Your Pantry from Beeyoutiful.com1) Ghee is a great source of nutrients. Ghee made from grass-fed beef is rich in vitamins A, D, and E, as well as K2 and fatty acids such as conjugated linoleic acid and butyric acid.

2) Ghee is very low in lactose. Ghee is a clarified form of butter from which the milk solids have been removed, leaving only the butter fat. Typically this allows those with milk allergies to consume Ghee without experiencing allergy symptoms. (With severe allergies to milk, please try Ghee only with a nutritionist or healthcare provider’s supervision, as ghee can still contain traces of lactose.)

3) Ghee is great for cooking. Because the milk solids have been removed, ghee has a higher smoke point than butter, making it a safe (and delicious) fat for sautéing or frying foods.

4) Ghee enhances nutritious foods. Many herbs and spices have qualities are that are potentiated when warmed in a fat. Sautéing spices and herbs in a bit of ghee before adding to your recipe can help release the medicinal properties and give you greater health benefits.

5) Ghee can increase butyric acid levels. Our own digestive tracts produce butyric acid; it’s used both for energy and for supporting the health of the intestinal walls. But with a leaky gut (or a gut that’s simply in poor health), we may not be able to produce the amount of butyric acid our bodies need. Using ghee not just as a cooking ingredient but taking it supplementally can increase the butyric acid levels in the body and thus increase gut health.

6) Ghee boosts the immune system. All the nutrients in ghee, especially Vitamin A, butyric acid and conjugated linoleic acid, are good for helping to aid and boost the immune system.

7) Ghee is delicious. It just plain tastes good! You can use Ghee in place of butter or other cooking oils in recipes. You can spread on toast and top with a favorite jelly or jam. Or you can eat it by the spoonful to get an extra dose of good fats!

shop Beeyoutiful.com

Foodie Friday: Gluten-Free Pumpkin Chip Mini Muffins

#FoodieFriday- Gluten-free Pumpkin Chip Mini Muffin Recipe from Beeyoutiful.com

It’s autumn: that time of year when everything begins to smell like cinnamon and great big pumpkins work their way into every possible recipe. Take advantage of the season with this delicious treat, and be prepared to share it when friends want to replicate the spicy sweetness in their own kitchens!

Gluten-Free Pumpkin Chip Mini Muffins

1 cup pumpkin puree, homemade or canned (NOT pumpkin pie mix)
1/2 cup butter, softened
2 large eggs
3/4 cup rapadura unrefined sugar
1 cup gluten-free flour blend (I used Trader Joe’s)
1 tsp baking powder
1/2 tsp baking soda
1/2 tsp salt
1/2 cup (gluten free) chocolate chips
2 tsp pumpkin pie spice blend (or 1 1/2 teaspoons cinnamon, 1/2 teaspoon nutmeg, and 1/4 teaspoon cloves)

#FoodieFriday- Gluten-free Pumpkin Chip Mini Muffin Recipe from Beeyoutiful.comPreheat the oven to 350 degrees. Grease a 24 cup mini muffin tin, or line with paper liners.

In a large bowl, whisk together the softened butter and eggs, adding the pumpkin puree and sugar and mixing until smooth.

Sift or whisk together the dry ingredients. Gradually incorporate into the wet mixture. Fold in chocolate chips.

Fill the muffin cups about 2/3 full and bake for 15-18 minutes, or until a toothpick inserted in the middle of the muffins comes out clean. Let cool for 5-10 minutes,  then remove from pan to a cooling rack.

NOTE: If you prefer to bake this recipe in a regular muffin tin or bread pan instead of as mini muffins, you may need to add xanthan gum or other gluten-free binders to prevent crumbling. I find that using mini muffin pans for gluten-free baking creates enough crust area that the muffin generally holds together well without requiring additives. 

Foodie Friday: How to Create Your Own Herbal Tea Blends (Plus a Recipe!)

#FoodieFriday- How to Create Your Own Herbal Tea Blends (Plus a Recipe!) from Beeyoutiful.com

#FoodieFriday- How to Create Your Own Herbal Tea Blends (Plus a Recipe!) from Beeyoutiful.com (2)Few things bring comfort to my mind as much as a warm cup of herbal tea on a crisp fall day. As the temperatures drop and leaves turn, my morning routine has begun to steadily include a mug or two of my favorite herbal delights! It is soothing, helps me slow down a bit and awakens me for the day, but even better, this liquid supports my body with vital nutrients and encourages my healthy immune system. How blessed we are that something so good for us is also so delicious.

While mixing blends is something anyone can do, there is some art to mixing a tea that is not only delicious but provides the nutritional support you need. You can have some delicious teas that lack nutritional density, or you can have a bitter stout teas that work beautifully but are literally hard to swallow! Learning to select a careful balance of herbs that have both taste and active properties, and that pair well, is the key.

Often herbs or spices fall into both categories, such as Cinnamon, Elderberries, Lemon Balm, and Hibiscus. They are all very nutrient dense while being quite tasty as well. Using these along with a more herbaceous tasting selection helps to cover the less delectable flavor and take your cup of grassy flavored water to a new level of bold fruity or spicy flavors.

#FoodieFriday- How to Create Your Own Herbal Tea Blends (Plus a Recipe!) from Beeyoutiful.com (1)When crafting an herbal tea, start by selecting your target outcomes. For example, if you’ve awakened with a scratchy throat and want to soothe and lend nutritional support, you’ll want to select herbs and spices to support throat health.

These could include (but definitely are not limited to) Slippery Elm Bark, Marshmallow Leaf or Root, Mullein, Cinnamon Bark, Elderberries, Hibiscus, Rosehips, Elderflower, Licorice Root, Garlic, and Cayenne. Now a big infusion of these herbs might help the sore throat, but wowzers! It might be really hard to get down.
Selecting a few of the powerful favorites and then pairing them with some flavorful teas will make a sip you will not only benefit from but enjoy drinking.

From these, I suggest selecting several that have historical benefits for the throat; Slippery Elm, Mullein, Marshmallow and Licorice Root would be my base. I’d use equal parts of each, and then add Cinnamon Bark, Orange Peel, Lemon Balm and Clove to help lend a little flavor. Licorice Root’s spicy warmth helps marry the flavors between the two groups.

Here’s a recipe for my favorite Throat Love Herbal Tea Blend.

2 Tbs Slippery Elm Bark
2 Tbs Mullein
2 Tbs Marshmallow Leaf
2 Tbs Licorice Root
1 Tbs Cinnamon Bark
1 Tbs Orange Peel
1 Tbs Lemon Balm
1 Tbs Cloves

Mix together and store in a dark glass or metal container. Use 1-2 teaspoons per cup. Steep in freshly boiled water for 10-15 minutes. Sweeten with honey or stevia to taste. Enjoy!

Herbal tea blends can be quite expensive, with some specialty blends costing as much as $50 or more per pound. A pound will make quite a few cups of tea, but knowing how to blend your own teas allows you to create your own unique flavors while going easier on the budget.

We would love to hear your favorite blends or recipes! Try out some of Beeyoutiful’s Tea Blends and let us know what you think.

Happy Tea Drinking!

Mary Ewing, Family Herbalist#FoodieFriday- How to Create Your Own Herbal Tea Blends (Plus a Recipe!) from Beeyoutiful.com

Foodie Friday: Healthy Lunch Ideas For Kids (plus free printable!)

#FoodieFriday- Healthy Lunch Ideas For Kids (plus free printable!) from Beeyoutiful.com

Heading back to school with healthy food can be a challenge for any parent. Here are some of our favorite ideas to make that daily task a little easier.

1. Turkey and cheese roll ups

Layer nitrate-free turkey slices with raw cheddar cheese and roll up. Bonus: add a slice of avocado for additional healthy fats.

2. Smoothies

Smoothies are a great way to add nutrients to a lunch! You can sneak fruit, vegetables, kefir, and superfoods such as beet root powder and Vitamin C powder into the blend and no one will even notice. We also add things like Liquid SuperKids, Kelp Powder, and Slippery Elm Bark Powder. If you are packing a lunch ahead of time, you can freeze the smoothies the night before and use is as an ice pack as they thaw in time for lunch!

#FoodieFriday- Healthy Lunch Ideas For Kids (plus free printable!) from Beeyoutiful.com 3. Kefir Ranch Dip and Veggies

Incorporating kefir into favorite recipes is a great way to get some raw cultures into your littles.

  • 2 cups kefir or plain yogurt (preferably homemade)
  • 2 tsp dried parsley flakes
  • 1 Tbs lemon juice
  • 1 tsp garlic granules
  • 1 fresh garlic clove, minced
  • 1½ tsp sea salt
  • ¼ tsp ground black pepper

Mix together and serve with sliced raw veggies such as bell peppers, cucumbers, and carrots.

4. Add a color

Pack a variety of colors in fruit and vegetables to get a variety of nutrients. This broadens the array of nutrients available, and helps get your kids used to eating a variety of foods.

5. Use leftovers

Reheat yummy food from dinner the night before– nutrient-dense stews and soups are especially suitable– and pack in a thermos to keep warm until lunchtime.

6. Boost with herbs

Add a boost to all your stews and soups by adding 1/4 cup Astragalus to your broths (strain before using broth). Then use Turmeric Powder to season soups and stews for added yumminess and immune-boosting support.

7. Herbal Tea

Instead of sugary drinks or juices, send stevia-sweetened herbal teas! Beeyoutiful’s Immuni-Tea is an excellent selection to use for lunchbox hydration. Kid favorites also include Lemon Balm, Hibiscus, Rosehips, and Peppermint. You can even blend in some less flavorful but power-packed herbs for added nutrients.

Help your kids build healthy habits with our fun printable checklist. Get yours by clicking below!

Give me my free healthy habit checklist!

 CORRECTION: Checklist should recommend ½ ounce of water per pound of body weight, NOT 2 ounces. We apologize for the error!

Healthy Habits Checklist for Kids from Beeyoutiful.com

shop Beeyoutiful.com

Foodie Friday: Grilled Corn, Southwestern Style

#FoodieFriday- Grilled Corn, Southwestern Style from Beeyoutiful.com

I never was a fan of corn, until I met grilled corn. Top it off with a savory, spicy sauce that makes you want to kiss the cook, and you have a meal for the books!

#FoodieFriday- Grilled Corn, Southwestern Style from Beeyoutiful.com
Mary’s Southwestern Corn

6-8 Ears of Corn, in husks

For serving:
1/2 cup freshly grated Parmesan Cheese
1 tsp Chili Powder mixed with 1/4 tsp Cayenne Powder
Lime wedges
Chili Garlic Crema (recipe below)

Pull back the outer husks but leave attached at the base of the corn cob. Remove the inner husks and silks and then replace the outer husks. Soak corn in cool water for at least 10 minutes.

Prepare grill to medium low heat and then place corn (with outer husk pulled up) on the grill. Grill corn for 20 minutes, rotating every few minutes and being careful not to burn.

When corn is ready, remove outer husks. Serve each cob with a dollop of Chili Garlic Crema, a sprinkle of Parmesan, a dusting of spices, and a squeeze of lime.

Chili Garlic Crema

1/2 cup Mayonnaise
1/2 cup Sour Cream
1 tsp Garlic Granules
1 tsp Chili Powder

Mix all ingredients and chill until ready to serve.

A Bone-Loving Sip

A Bone Loving Sip from Beeyoutiful.com

Using herbs that are abundant in bone and muscle-supporting minerals such as silicon, magnesium, calcium and selenium is a smart and easy way to build health. Turn those herbs into teas and you can stay hydrated at the same time!

Horsetail (also called Shavegrass) and Nettle Leaf make an amazing base for a tea that supports bone and muscle health. Using those two as the base, you can add in fresh fruit or other more tasty herbs to customize and add flavor to the brew. A Bone Loving Sip from Beeyoutiful.com

You can also brew strong infusions of Horsetail and Nettles for use in smoothies, or add a bit to bone broths.

Here is my favorite way to enjoy these bone-loving herbs!

Mary’s Bone Sips

1 tsp Horsetail
1 tsp Nettles
1 tsp Hibiscus
1 tsp Lemon Balm

Mix dried herbs together and steep for at least 20 minutes in 1 quart of freshly boiled water. Strain herbs and serve hot or cold. If desired, sweeten with honey or stevia and add a twist of lemon.

shop Beeyoutiful.com

Foodie Friday: Simple Yet Delicious Crispy Company Chicken

#FoodieFriday- SIMPLE YET DELICIOUS%0ACRISPY COMPANY CHICKEN from Beeyoutiful.com

Thanks to this recipe, roasted chicken has become a favorite easy dinner at my house! It’s simple enough to make anytime with some advance planning, and beautiful and delicious enough to serve to guests.

During the week I might pair a bird with easy roasted potatoes and carrots, or for a weekend company meal perhaps dress it up with mashed potatoes and gravy along with fancy green beans.

No matter the side dishes, this recipe with its combination of brining and roasting produces savory moist chicken with crispy skin every time. Serve it up as a family meal, then pick the rest of the meat off the bones for chicken salad or a casserole a few days afterward. Don’d forget to use the carcass to make a pot of nourishing bone broth for later, too!

#FoodieFriday- Simple Yet Delicious Crispy Company Chicken from Beeyoutiful.com

Crispy Company Chicken

Use a cup of freshly boiled water to mix and dissolve 1/4 cup kosher salt and 1/4 cup brown sugar or Rapadura. (If substituting a different kind of salt, use half as much.)
Place chicken in a pot or lidded container large enough to submerge the entire chicken. Add at least two quarts (8 cups) of cool water, then pour in the salt/sugar mixture. Add more water as needed to submerge chicken.

Add to the pot the juice of half a lemon or a splash of apple cider vinegar. If desired, add a few bay leaves, a few whole allspice, about a dozen whole peppercorns, several sprigs of rosemary, or any other whole spices (ground spices aren’t recommended, as they’ll cloud the brine and discolor the chicken).

Cover the pot and place in the refrigerator. If starting with fresh or thawed chicken, brine for 3-8 hours. If starting with a frozen chicken, brine until the chicken is completely thawed. (Avoid brining too long, as it may result in mushy chicken.)

Drain off brine and discard spices. Use baker’s twine to tie legs together and place chicken in a roasting pan.

Pat chicken dry and rub with a few tablespoons of softened butter, coating the skin thoroughly. Sprinkle generously with more kosher salt and coarsely ground black pepper.

Place chicken in a 425 oven for 15 minutes, then lower the heat and roast at 350 for 20-25 minutes per pound. After one hour, carefully remove the pan from the oven and baste the chicken in its juices. Return chicken to oven until time is up and chicken is cooked through.

​Notes:

This recipe works for chicken parts, too! Shorten the brining and baking times for smaller pieces.

You can multiply the salt/sugar solution and spices if brining several chickens at once. Use a very large container and be sure all parts of the chicken are covered with water. Lengthen baking times to allow for more mass in the oven.

Brining results in moist, flavorful meat. Buttering the skin, starting the oven at high heat, and basting partway through are the keys to getting a delicious golden crispy skin.

Don’t throw away the chicken carcass! Use it to make tasty bone broth. If you don’t have time to make it right away, freeze the chicken bones for later.

Share this recipe with a friend; maybe they’ll take the hint and invite you over for dinner!

shop Beeyoutiful.com

Foodie Friday: Grilled Sweet Peaches

#FoodieFriday- Grilled Sweet Peaches Recipe (2)

Nothing says summer like a barbecue, and one of my favorite things is to try new foods on the grill.

Grilling vegetables and fruits is fun, and it brings out different flavors than cooking them on a stovetop. One of my personal favorite flavors that captures all the yummy goodness of summer is grilled fruit.

#FoodieFriday- Grilled Sweet Peaches RecipeFire up your grill and join me for some of this delicious decadence!

Grilled Peaches

4-5 medium-sized peaches, sliced in half and pits removed
1 cup Rapadura
2 tsp ground Cinnamon

Clean grill well and coat with coconut oil before starting.

Stir together Rapadura and Cinnamon in a mixing bowl. Toss sliced fruit in the sugar mixture to coat. Grill over low heat for 3-4 minutes, being careful not to allow them to burn. Serve hot as a stand-alone dessert or with a dollop of raw cream.

« Older Entries