How to Sprout Grains at Home
By Peggy Sutton
Many folks have been introduced –or I should say re-introduced– to the goodness and digestibility of sprouted grains and sprouted grain flours. Sprouted grains are not a newfangled food trend but a tried and true traditional means of preparing grains, dating as far back as biblical times and as recent as the industrial revolution.
Until modern farm equipment was invented to gather grains out of the field quickly for shipment to cities and large storage facilities, grains were cut and stored in teh fields until time to use or sell them. While the grains awaited use, the dew and rain would naturally sprout the head of grain. The result was an organically more healthful grain product.Today, at-home methods of sprouting grains before baking entails just a few easy steps and not very much time–and the benefits are worth every minute of the process.
Here’s what sprouting accomplishes:
- ~ Sprouting neutralizes phytic acid, a substance present in the bran of all grains that inhibits absorption of calcium, magnesium, iron, copper, and zinc.
- ~ Sprouting neutralizes enzyme inhibitors present in all seeds.
- ~ Sprouting produces enzymes.
- ~ Sprouting breaks down the starches in grains into simple sugars so the body can digest them like a vegetable (e.g., a tomato, not a potato).
- ~ Sprouting produces vitamin C
- ~ Sprouting increases the grains’ carotene and vitamin B content.
So let’s get started!
The equipment for your sprouting operation is not elaborate, but each item is important. This is what you’ll need:
- 1. 4 to 8 1-quart mason jars with large-mouth lids;
- 2. 1 plastic needlepoint grid, 7-mesh size (available at WalMart or craft store)
- 3. 1 or 2 large round bowls, big enough to place 4 of your mason jars in an upright position;
- 4. A large colander and small strainer;
- 5. 1/4 cup organic cider vinegar;
- 6. 6 to 11 cups of; organic grains (For breads, cookies, pastries, try wheat or spelt. For sour dough starter, try rye.)
- 7. Filtered water.
Before setting up the actual sprouting, wash and sanitize your grains. Although not absolutely essential, I strongly recommend it. Grit often adheres to your grains, and you never know what kinds of “critters” walked through the field where your grains were harvested.
So here’s the washing process:
- 1. Fill your kitchen sink with room-temperature tap water.
- 2. Pour your grains into the water, and agitate them thoroughly for a minute or two.
- 3. Using a colander, scoop up all the grains you can. Then use the small strainer and your free hand to scoop the remaining grains into the colander. If you have a strainer that fits into your sink drain, it will work great to get the remaining grains and drain the water at the same time. Hold the grain-filled colander under the tap for a quick rinse.
- 4. Clean your sink thoroughly of all grit and fill with 2 gallons of tap water. Stir in 1/4 cup of organic cider vinegar.
- 5. Dump your washed grains into the vinegar solution and let stand for 7 to 10 minutes.
- 6. Repeat Step #3.
Now your grains have been properly washed and sanitized, and it’s time to begin the sprouting process.
- 1. Place about 1 1/3 cups of clean grains into each mason jar (if you’re baking only 1 large loaf of bread you will only need 4 jars).
- 2. Fill each jar with filtered water (the grains will sit on the bottom of the jar).
- 3. Place mesh lids* and screw-tops onto each jar and tighten well. Let jars sit on your counter for 4 hours. The ideal temperature for fast, even sprouting is 69 to 72 degrees F. You may need to place in your pantry or laundry room to maintain an even temperature.
- 4. After your grains have soaked for 4 hours (it won’t hurt if they soak for 5 or 6 hours, so don’t worry if you’re busy and can’t get back to them after just 4), hold each jar over your kitchen sink and turn upside down, letting all the water drain out.
- 5. Turn each jar right-side up and fill with tap water. Then turn them over again and let all the water drain out of the jar.
- 6. Once you’ve completed steps 4 and 5 for each jar of grains, place your jars in a large bowl at a slant with the meshed lids toward the bottom of the bowl. This will allow more water to drain off the grains as they sprout. Place the bowl on your counter and leave overnight.
- 7. If you are completing step 6 by early afternoon, then repeat steps 5 and 6 in the evening, and leave jars in the bowl to sprout overnight.
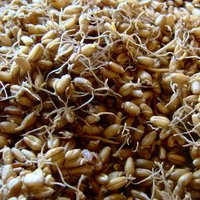
- 8. By mid-morning your grains should be sprouted. You are looking for a distinct white tail on the end of the grains. Usually sprouts begin with a 2-pronged antenna protruding from the end of each grain. (NOTE: Do not let your sprouts grow beyond 1/4 inch in length, or your grains will take on a “grassy” taste and will be hard to feed into your mill or grinder once dried.)
You’re almost finished! Now it’s time to dry your sprouts.

- 1. Remove the sprouted grains from each jar and spread onto parchment-lined baking sheets (with sides) or place onto racks in your dehydrator (set at 105 to 110 degrees, and let grains dry thoroughly).
- 2. If you’re using your kitchen oven, place pans onto racks and set oven at its lowest temperature. If that temperature is above 110 degrees, prop your oven door open about 1 inch at the top using a wooden spoon or dowel. Let grains dry thoroughly. This will take several hours or overnight. (NOTE: Most new ovens, since about 2000, have built-in dehydrators. Check your owner’s manual to see if you have one–it took me 3 years to discover mine!)
Store your dried grains in an airtight container in the pantry until you are ready to mill.
Sprouting is not limited only to common flour grains. I find that sprouting beans before making soups, chili, and hummus eliminates bloating and gas after eating them. Try sprouting wild rice, and mill it for gluten-free baking. There are lots of foods you can sprout for better digestibility. Be creative and have fun!
And, of course, if you are not inclined to do your own sprouting, please let us do it for you. Check out To Your Health Sprouted Flour Co. today at http://www.organicsproutedflour.net. Also, we have lots of recipes on our web site to try with the fresh sprouted flour you made on your own. Happy Baking!
*To make meshed lids for your jars: Remove a solid lid from a jar top. Place the lid on the needlepoint grid and using a pen or Sharpie, trace a circle. Repeat this step for each of the jars you will use. Then cut the mesh lids out using scissors, and place one inside each jar’s screw-top instead of the solid lid.
Peggy Sutton is the owner of To Your Health Sprouted Flour Co., online and wholesale supplier of sprouted flour products. She founded the company in 2006 to produce fine baked goods and now specializes in sprouted flours, including wheat, spelt and rye. Peggy lives with her husband, Jeff, in Alabama.

Join the conversation!